Showing posts with label Jess Doings. Show all posts

4/30/13

My take on Word Art

I completed this "art piece" a while back and never posted it.  I was inspired by all the word art out there on Pinterest and came up with this:


I used Jeff's favorite Scripture, Psalm 139, a piece of plywood, my circut for cutting the letters out, contact paper, and paint. I basically made my own letter stickers by cutting out contact paper.  Then I just stuck the letters on my plywood and painted over it.  I began by spray painting it white and then added additional colors to create a soft water colorish effect.  I then pulled the stickers off and waala! Totally easy (but timely) project that anyone can do. 

6/24/12

Pinned It, Did It: Dip Dyed

Okay, really what I did should be called dip painted but that just doesn't roll off the tongue.  Dip dying is pretty hot right now, from hair, to clothes, to furniture.  Jeff just said, "they dip everything, its like furniture fondue." 

from design sponge
from coastal theory 

I saw these two pics below and decided I wanted to try it myself.

from martha stewart
Paint-Dipped Vase
from women's day

 
I'm not quite ready to dye the tips of my hair so I started with these little vases.

And finished with this.  I think I like the way it turned out.

It was super easy, this is how it went down:


4/30/12

Our weekend

We had a great weekend.We got to spend time with many of our family members.  Friday night we attended a gender reveal party for our soon to be nephew! On Saturday morning, we had breakfast with Jeff's family and then visited both Jeff Grandma and my grandma who are both in nursing facilities recovering from injuries.

My Grandma Gerry with my cousin, Stacey and her daughter, Parker.

My Grandad Forrest with Wesley and Parker.  Wes loves his great grandaddy.
Then we went over to my brother's house and Jeff helped my brother and dad build a new fence (of course he did, right?)


On Sunday, we were back home and enjoyed a nice church service and a fun time with friends for dinner.  Here is a video of Wesley entertaining our group of friends.  I think I realized last night what a ham he is.  As soon as he noticed every one watching him he put on a show.  Also, this is wesley going on 7 hours of no sleep, so he was deliriously happy.  Oh, yeah, and he almost walked!

4/18/12

Pinned It, Did It: String Art


String art is all the rage right now.  I pinned this image a while back from another Pinterester and just knew that i wanted to jump on the string art bandwagon and make myself something. 

Just move that little heart up a bit and it would be perfect!  I <3 Texas.

So i searched further into the depths of Pinterest and found these images. Some a little more ambitious than others.
string
string art
DIY string heart art

Then I stopped at this one and did my best to make my own version of it.  
string art | love

This is what I came up with.

I started with a scrap piece of wood I found in our backyard from one of Jeff's projects. Then I painted it with a thin coat of this peachy paint I had been wanting to incorporate into our living room. 


Next, I printed out the word LOVE.  I don't have any cool fonts so I settled on this one. Cant even remember what its called.

Next, I taped my paper to the wood and began hammering little nails about half way into the wood.  

After I (err Jeff) finished hammering all the nails in, I ripped off the paper and was left with this.  (Don't pay attention to the blue string, it was my trial run.)

Then I got busy wrapping and wrapping and wrapping string around the nails until I thought it looked good.  By the way, I used regular old sewing thread for this project and doubled it up.  I think it turned out okay.  If I had done it bigger, I would have probably wanted to use a thicker string, but I just used what I had on hand.

This is really a project that anyone can do.  It doesn't have to be exact to look good, trust me, mine is not exact at all.  ANd um I think it looks good :)


Happy Crafting Friends!

4/14/12

My Mommy Diary 4.14.12

what i'm currently thinking about motherhood...

I didn't sing to my baby tonight, I let the ipod do it.  And I'm feeling a little guilty.  I mean I was thinking, gosh, I should be singing to him right now...I love singing...why am I not singing?!?  What's the big deal? Nothing really, but I always thought I'd be a mom who sang to her child all the time, and certainly at bed time.  But I was just too tired, and usually am.  Jeff and I joke that we have been living zombies for the last 10 months.  Wesley is a horrible sleeper (and that's a topic for another time), so Jeff and I rarely get a good night sleep, leaving us tired   all   the   time!!  Its almost comical the expectations I had for motherhood...what I thought it would be like, or I would be like.  It would be comical, if I weren't so tired.  So much of motherhood is different than what I expected...I mean at 10 months I expected to have a child who slept through the night!  I remember telling Jeff about one week into this adventure, "Wow, our world has been rocked!" In that moment, I also apologized to the universe for how judgmental I had been towards other moms I knew.  But I also don't think I expected motherhood to be as amazing as it is, i mean, I expected it to be great, i just don't think you can imagine how great until you are there.  I think I say a million times a day how cute my Wesley is.  And he already has me laughing out loud, whether its his new little chuckle, or him trying to feed me or stick his pacifier in my mouth.  I mean, you just can't dream this stuff up.  Motherhood is hard and awesome, but you can never know how it will be till your there. And there is a certain beauty to that.  I can't wait for the next 20 years to see how all my expectations will be blown to pieces.     

4/12/12

I'm an amazing helper

I couldn't resist adding these photos of me helping with the deck.  Ignore the white white legs and totally lack of appropriate working attire and just look at the level of concentration in my face.  This tool was really fun to use and super easy too.  (I can't lie though, my abs and hands were sore the next day....I'm soooo out of shape). 


And if you READ MY BLOG EVERY DAY (no, I'm not shouting) and I know you do, you'll remember that Jeff found the screw gun at a garage sale for only 30 bucks!  He wasn't even looking for it...I think it was a God thing :)


Did you notice the demise of our urban garden in this picture?  Its ok, as mentioned in the previous post, Jeff is working on a bigger and better garden, and we are already planning how we can reuse the wood from those guys in some cool art project.  Stay Tuned!

4/5/12

Super easy fabric flower tutorial

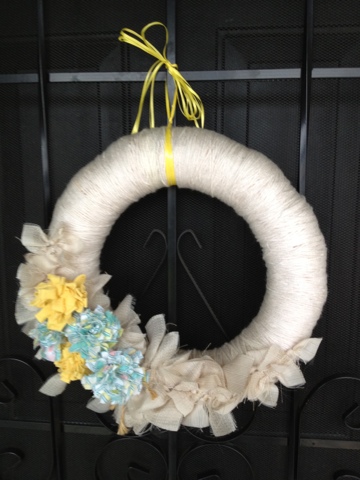
This weekend I changed up my front door wreath and added these easy fabric flowers for Spring!  I thought I'd show you all how I did it because I have not seen this technique on blogs before.  And it is really super easy.  Its my favorite way to make flowers because nothing has to be exact and you only need a few supplies.

Easy Fabric Flower Tutorial:

Supplies:
Fabric Scraps
Scissors
Hot glue gun


Step one: Cut a long strip of fabric.  I usually make mine about 3 inches wide and 15-20 inches long.  But you can do whatever size you want.  I thicker strip will make a larger flower, and the length will determine how fukll the flower is.  I like to have different sizes in my arrangement, so I just vary the size of strip I start with.  Notice, my strip isnt even even at all.  I love that it doesnt have to be exact because I cant cut straight to save my life. My piece of fabric was also very wrinkled...it still works!
Step 2: Fold stip in half length wise, and press (with your fingers, not an iron).
Step 3: While it is still folded, cut small stripes down the length of your big strip.  Start on the folded end and dont cut all the way through (go about 3/4 of the way down). 

Step 4: Add a dap of glue to one end and start rolling the strip into itself. 
Step 6: Keep rolling (or I like to wrap, once I get it started), adding glue as you go along to keep it together, until the whole strip is rolled up. 


It should look like this.
And when you flip it over, you have a pretty little flower.
Optional step 7: If you like the look of your flower you can stop here, but if you want it to have a more loose or messy feel to it, then start cutting the "petals" in half.

When you are finished cutting all your petals, it will look like this.

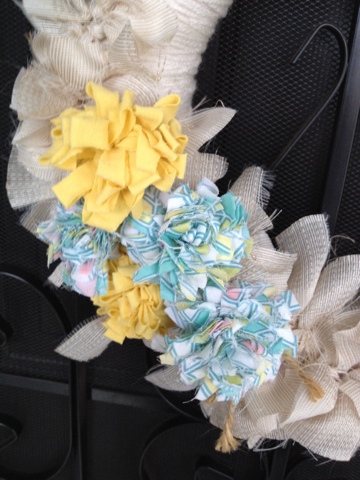
I used straight pins to attach the flowers to my wreath.  You could also use hot glue to attach them as well, but then you wont have an interchangeable wreath like I do :)


FYI- the rest of the wreath was made by wrapping yarn around and around and around a straw wreath I purchased from Joann's.  Then, I cut pieces of fabric about 1-2 inches wide and 4-6 inches long and simply tied them in a knot in the middle (like you are tying your shoe).  I made about 20-30 of those pieces and just layered them on my wreath, adhearing with glue gun.  It creates a nice background for the different flowers I add each season. 

Now go and make yourself a pretty little spring wreath with fabric flowers!