Showing posts with label nursery. Show all posts

6/8/12

Yarn Pendant Light


This yarn pendant light was one of my most daring nursery projects and I was so surprised that it actually turned out.  Its been going strong for over a year too.  You can find these pendants all over the web but here is the video i used to make mine: Pendant Light Tutorial Video.  It wasn't too hard, you can make one too!


6/7/12

Easy and Cheap DIY Baby Mobile

For Wesley's mobile I created a super easy and super cheap version of some mobiles I saw on Etsy.  If you are a perfectionist, you may want to stop reading because my methods may drive you mad.  This project was done the easiest and quickest way and is in no way perfect.  (you will be able to see that in the detail pics).  But I think it works just fine and  I am very happy with the way it turned out.

DIY Baby Mobile 

What you need to make your own:
construction paper
sewing machine and thread
two small dowels (got ours at Michael's)
fishing line
hot glue gun
small hook to attach to ceiling
paint (optional)
circle punch (optional)

Step 1: Cut out circles
I just used regular old scissors and cut out circles out of regular old construction paper.  They are not perfect circles and I wanted several different sizes, so I just went to town cutting. 

Step 2: Sew circles together
Did you know you can sew paper? Welp you can.  Just feed the circles through like you are sewing anything else and wait a few seconds before you add the next one.  The few seconds in between will create the spacing between your circles. I went completely random in the order I fed the circles through.  
(If you don't have a sewing machine, you could just glue circles to string)
Step 2b: Create separate strings of circles
You can do this two ways.  you can sew one looooong string of circles and then cut the strings at the desired lengths.  Or you can start and stop sewing each new string.  Either way you do it, you want to end up with 17 strings.  If you are more exact than me, you will want to measure your strings and make sure that you have 4 each of 4 various lengths, plus one extra string that is the longest. I just did mine at random lengths (are you beginning to understand my ways?).  


Step 3: Attach dowels together
Optional step: paint dowels first.  I kinda wish I would have painted mine. 
Form an X with your dowels and secure together by wrapping thread or yarn around the center.  I couldn't get mine tight enough so I used hot glue to help bond them together as well as the thread.

Step 4: Attach strings to dowels.  
You will tie one string of sewed circles to the X of your dowels and then four strings on each dowel leg.  I simply tied the thread around the dowel and then secured it in place by adding a drop of hot glue. 


Step 5: Attach fishing line to dowels
This was the tricky part for me.  I couldn't figure out a way to keep the mobile balanced, so I ended up tying fishing line to the ends of each dowel leg (and securing with hot glue).  Then I gather the four strings together above the X and tied them in a knot with a long string of fishing line.  I attached the end of the fishing line to a small hook that screwed into the ceiling. 
  

6/6/12

Free Nursery Printables


Today for nursery week I have provided a free printable of the nursery art I created for Wesley.  They are very simple and something anyone could create, but if you dont have the time, feel free to download one here.
The prints are saved as jpegs, so just right click the one you want and click save as. Then you can open it in the program of your choice and print it out the size you need.  


6/5/12

Wesley's Nursery

Here are the pictures of our completed nursery. It was a labor of love as we handmade many of the items in the nursery from the crib bedding to the dresser. And dont let me for get about painting those stripes!  We also received several handmade gifts including the 3 paintings you see below hanging above the crib.  Our dear friends Randa and Ethan gave those to us. 

I sewed the crib sheet, crib skirt, and even recovered the glider cushions myself.  It was a major feat to say the least. 
I also made the mobile and covered an Ikea lamp shade in chevron fabric.  The book shelves in the picture above are actually Ikea spice racks that we painted black.
Find out how I made the mobile HERE

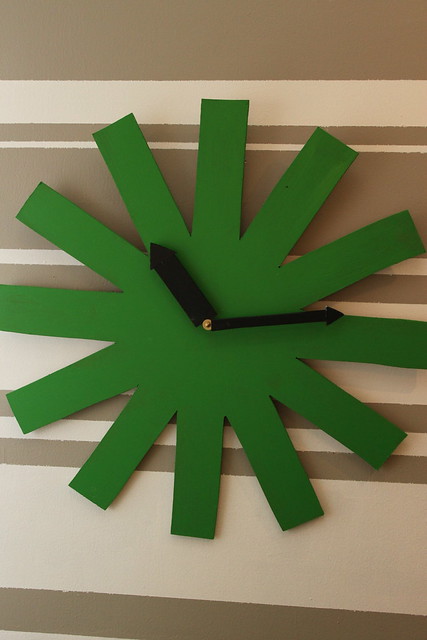
Jeff made the asterisk clock and window mirror.


We found this dresser at a thrift store and painted it white and added the decorative trim and new handles.  I also made the changing pad cover using this tutorial from Prudent Baby.

 I also sewed the "Wesley" pillow you see in his crib. The rug is from Ikea.
 I saw several prints on Etsy that I liked and created my own version of them. (you can download a free printable here.)  Jeff created a valence box to hang above the closet and I sewed a curtain out of old sheets.
 Jeff made the floating shelves and we framed chalkboard contact paper in cheap frames from Ikea. 
 Wesley loves his room so all the hard work was worth it!  

6/4/12

Nursery Week


It's nursery week here at Look What Jeff Did because Jeff is out of town on a work trip.  And just so you know "work trip" for Jeff is helping a group build homes on an Indian Reservation in 100 degree weather...he is pretty much a saint. Anyway, so since he is gone, and things on this blog pretty much happen in real time, I thought I would use this time to feature Wesley's Nursery and all the projects and handmade goodness that we created for him.  It is also my goal to take good quality pictures of the Nursery and get them up tomorrow.  Today, I am featuring a few projects that I already posted (over a year ago).  Enjoy!   See you tomorrow with some good picture (fingers crossed).


IMG_6984

IMG_6580


6/2/11

Chalk it up

The chalkboard. Once a classroom staple, has made its way out of schools and into the home. Seriously, show me a chalkboard that's still in a classroom, seems like all schools are using whiteboards now...such a shame. But look online at home decor and you'll find design inspiration chalk full of chalkboards :) They are showing up in all areas of the home including nurseries and kitchens. You will find entire walls painted with chalkboard paint, or just small details. I even found tons of chalkboards showing up in wedding decor and pictures.


So, I can't lie, I'm jumping on the trendy chalkboard bandwagon too. I decided to use it in our nursery so we can write little messages to the Wesley baby. I really didn't want to paint again...remember the stripes? I was kinda burnt out of painting, so lucky for me, my mom found me some chalkboard contact paper. yay! Where o where did you find this mother? She told me but I can't remember.

So with my chalkboard contact paper in hand and several small green frames that I wasn't sure what to do with, I created this "chalkboard wall."


This is a really bad picture, but you get the gist, right?
The chalkboard frames are the first thing you see when you walk into the room. The perfect place for a little note. (Just need to buy some chalk now).

But I still had some chalkboard contact paper left and a few boxes that needed a makeover. My friend and neighbor gave me these cute boxes that just didn't match the nursery theme. I was planning on painting them (but you know how I feel about painting), then I got the brilliant idea to cover them with the chalkboard contact paper. This is how it went down...


This is what I started with. I was able to just pop off the little star.


Then I just started wrapping until all the sides were covered.


And this is how it turned out. Not perfect, but the lid will hide the imperfections. It was so much easier than painting.

Now I just need to decorate them in chalk!

chalkboard1, chalkboard2, chalkboard3, chalkboard4, chalkboard5

5/26/11

Mirror mirror on the wall

We had a little problem in the nursery, well actually two problems that we solved with a DIY'd mirror. Our house is full of "charm" as they call it and one of the most charming rooms of all is our now nursery.
Problem 1: No window! One of the previous owners decided to make the master bedroom bigger and add a walk-in closet. They built the closet on the back of the house where the window to the nursery was thus closing off that window. The bigger master bedroom also meant a smaller second bedroom, which is why it's perfect for a little nursery, well, except for the no window part.
Problem 2: Funky, uneven built-ins that dont make any sense. Some people might like these little guys, but I loathe them. They aren't deep enough to put books in and dose anyone else notice that they are not the same size? Im not sure what the purpose is or was for these guys and I tend to think they were not original to the house, but you never know. Ok, I dont have a good picture of them, but you will see them later on...in this same post, but I would be revealing a secret if I showed you that picture now.

Solution for both problems: A window mirror built by handy dandy Jeff himself. The reason we had to build a mirror is because the dimensios needed to cover the built-ins were so unusual. Also, as we started looking around for mirrors, we realized that they are really expensive. We also thought about asking my aunt and uncle, who sell beautiful mirrors at the Orange County Swap Meet, for a custom fit, but they recently gifted us with a beautiful mirror for our bathroom, so I couldnt bear to ask for another one. Also, their mirrors are top notch, so wven with the family discount, they would be out of our price range. So, it was time to get creative.

Searching the blogesphere I came across this diy project that I thought we could possibly pull off (by we, I mean Jeff).
Lindsay from Living with Lindsay built this Pottery Barm knock off for only $60.


The original from Pottery Barn costs $700..whoa, go Lindsay.


Jeff's version, while not as refined (in true Jeff fashion, he just slapped on what we had laying around the garage) only cost us about $25, but like I said, we had all the lumber on hand. We basically paid for two packs of these 12 inch mirrors from Ikea that cost $6 each.

Another $12 or so dollars were spent on a hinge for the mirror (more on that in a bit.)

This is how it turned out:
please ignore the fat lady taking the pictures and the dirt on the mirrors. For some reason, I havent felt the need to clean those yet.


So, problem number one is fixed because this mirror mimics a window and the light just jumps across the room. You almost forget that there isnt any real light in there.

And remember the built-ins I talked about. Well, they are nicely hidden now, but still accessible thanks to a hinge installed on the mirror making it a door. Now I just need to find a use for those things. Can you see how weird they are?


Jeff accomplished this project in like 2 hours. He was so quick that I dont have a tutorial for you or any in progress pictures. But the Lindsay mentioned above has a very nice tutorial, so I suggest you check it out if your in the mood to build an awesome mirror.