5/31/11

Sneak peak

At some projects I accomplished this weekend. I just hung the art. It was a gift from my talented friends randa and ethan over at fromunderthewillowtree.com. yes the same friends that threw us an amazing baby shower. But I did DIY that chevron pendant light!  More details and pics to come.


what we did this weekend

Jeff and I had quite a busy and productive weekend. He almost single handedly completed the bathroom project (pictures coming soon), and I say almost because he had some major help from our friend Brent and my dad. Its looking great right now, Jeff just has some finishing touches to make it really shine!

I was able to check several nursery projects off my list including making a crib skirt, changing pad cover, and curtain for the closet, organizing clothes and toys, washing clothes and blankets, and hanging some art. I definately made some headway on my nursery project list. It's pretty much ready for baby Wesley to be here, and I will be posting some pictures soon.

The long weekend was so nice and just what we needed to scratch a few things off our list before baby comes.

Thanks to all those who have served our country.

5/29/11

Bathroom progress

Project bathroom has begun. After about 30 (literal) hours, Jeff has accomplished all this. And he even took a break today for a memorial weekend bbq. Amazing right?


5/27/11

Bee is for Boy


My friend Randa planned the most amazing baby shower for us down here in San Diego. Her creativity and decor skills are awesome. Please go check out her website to see pictures of the shower and swoon over her mad skills. Be prepared, you will be jealous and wish you had a friend like that. Of'course, she didn't do it alone, her husband Ethan spent many late hours cutting this and gluing that, and a big shout out to Gayla for providing the backdrop (her home) and the food, and the cake and cupcakes you'll see on Randa's blog were made by our good friend Erin. We are so blessed to have so many good friends here in San Diego. Thanks to everyone who helped out!

5/26/11

Mirror mirror on the wall

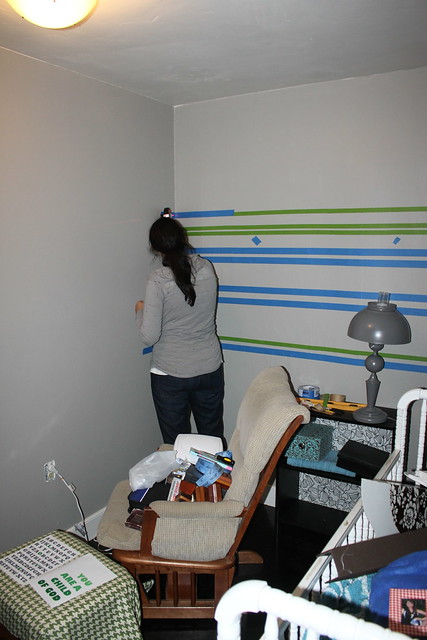
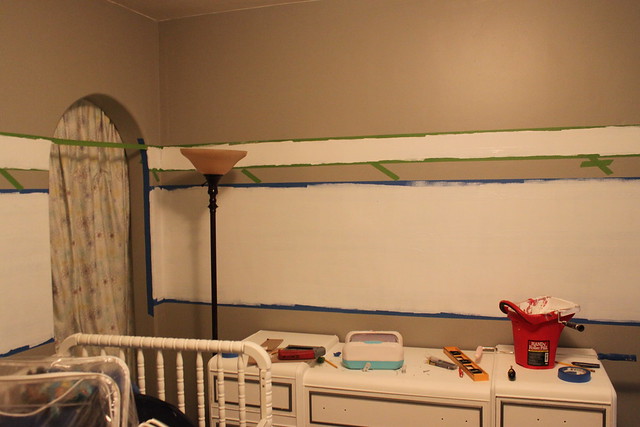
We had a little problem in the nursery, well actually two problems that we solved with a DIY'd mirror. Our house is full of "charm" as they call it and one of the most charming rooms of all is our now nursery.
Problem 1: No window! One of the previous owners decided to make the master bedroom bigger and add a walk-in closet. They built the closet on the back of the house where the window to the nursery was thus closing off that window. The bigger master bedroom also meant a smaller second bedroom, which is why it's perfect for a little nursery, well, except for the no window part.
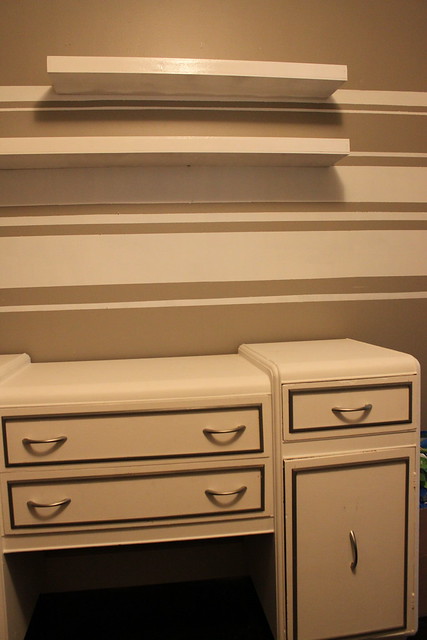
Problem 2: Funky, uneven built-ins that dont make any sense. Some people might like these little guys, but I loathe them. They aren't deep enough to put books in and dose anyone else notice that they are not the same size? Im not sure what the purpose is or was for these guys and I tend to think they were not original to the house, but you never know. Ok, I dont have a good picture of them, but you will see them later on...in this same post, but I would be revealing a secret if I showed you that picture now.

Solution for both problems: A window mirror built by handy dandy Jeff himself. The reason we had to build a mirror is because the dimensios needed to cover the built-ins were so unusual. Also, as we started looking around for mirrors, we realized that they are really expensive. We also thought about asking my aunt and uncle, who sell beautiful mirrors at the Orange County Swap Meet, for a custom fit, but they recently gifted us with a beautiful mirror for our bathroom, so I couldnt bear to ask for another one. Also, their mirrors are top notch, so wven with the family discount, they would be out of our price range. So, it was time to get creative.

Searching the blogesphere I came across this diy project that I thought we could possibly pull off (by we, I mean Jeff).
Lindsay from Living with Lindsay built this Pottery Barm knock off for only $60.


The original from Pottery Barn costs $700..whoa, go Lindsay.


Jeff's version, while not as refined (in true Jeff fashion, he just slapped on what we had laying around the garage) only cost us about $25, but like I said, we had all the lumber on hand. We basically paid for two packs of these 12 inch mirrors from Ikea that cost $6 each.

Another $12 or so dollars were spent on a hinge for the mirror (more on that in a bit.)

This is how it turned out:
please ignore the fat lady taking the pictures and the dirt on the mirrors. For some reason, I havent felt the need to clean those yet.


So, problem number one is fixed because this mirror mimics a window and the light just jumps across the room. You almost forget that there isnt any real light in there.

And remember the built-ins I talked about. Well, they are nicely hidden now, but still accessible thanks to a hinge installed on the mirror making it a door. Now I just need to find a use for those things. Can you see how weird they are?


Jeff accomplished this project in like 2 hours. He was so quick that I dont have a tutorial for you or any in progress pictures. But the Lindsay mentioned above has a very nice tutorial, so I suggest you check it out if your in the mood to build an awesome mirror.

5/25/11

Project Bathroom

One of the projects we wanted to complete before the baby arrives is to tile the shower surround in our bathroom. We only have one bathroom in our tiny house, so my thinking is it would be better to have it inoperable pre-baby. So this weekend, Jeff has decided to tackle project bathroom. When we moved in to our lovely little home, the bathroom along with everything else was pretty discusting. Here are some before pictures with the previous tenants' stuff:


And this is me trying to clean the gross bathroom after we bought the place. Notice the broken drawer, awesome lamenant floors and the "marble" shower surround. More on the beautiful "marble" later and why we're tearing it down.


Here was our first attempt and a remodel. Basically just added paint to the walls, a cute shower curtain (to hide the "marble")and other accessories.


But then we realized that the paint color was a little too bright (really gave you a nice wake up call in the morning), and we could do more on our budget to spruce the place up, so this is what it looks like now.


When you visit our home, this is what you see. Not bad right? We painted the exisisting vanity and built-ins and that really helped it look a lot nicer. We also covered the lamanant floors with more modern looking lamenant tiles :). My aunt and uncle gifted us the beautiful large mirror. I made a simple window covering using this idea from the blog Making it Lovely. Then we hung a crisp white curtain from the ceiling to the floor to hide our shower. yep, hide it. The curtains are the same ones from ikea that we bought for our outdoor space, but it white.


Because this is what it looks like without the curtains. Warning these pictures are a little disturbing!


Still gross! Please dont judge us. And I just cant see myself bathing a child in that tub, so the project begins. Jeff plans to reglaze the tub and replace the "marble" surround with white subway tiles going all the way up to the ceiling. I can't wait. More details to come!

5/24/11

Bathroom Inspiration

Project Bathroom is scheduled to take off this weekend! Yay, I am so excited. Of'course we aren't doing a major overhaul of the bathroom (in my dreams), but Jeff is going to tear out the old tub surround and tile it with crisp white subway tiles. Our bathtub and shower are pretty gross, so it is going to be so nice to have this project completed. SO before I go in to details on the make over, here is some bathroom inspirtation.


I just love white subway tiles. What do you think?


5/23/11

A little Monday Morning Laughter

This is actually my brother...so proud.


So the story goes that Troy put on his friend's pilot jacket and said, "Hey this looks like something Michael Jackson would wear." Jordan (brother #2) said, "you've got to roll up your pants too." Troy did, and then proceeded to do this. Mind you, there is no one else around.

get your laugh on.

5/19/11

Spice rack book shelves

Here are some pictures of the IKEA spice racks that Jeff turned into beautiful book shelves for our little babe.


5/18/11

Jess does too!

Look what I made for my mother in law for mother's day!


IMG_7106

I started with a straw wreath from Joann's and wrapped it in some yarn I had on hand. That part took me about an hour! Im learning that patience is a key ingredient to crafting. Luckily, I could wrap while watching me some Law & Order re-runs (im kind of addicted to crime shows). Next I took some fabric scraps I have collected over the years and started making my flowers. I was actually inspired by this wreath from jones design company:


She made her's with sheet music and rolled paper flowers (which I am now addicted to making). Im planning on covering my little house with paper flowers soon. They are super easy and look really cool. Ms. Jones gave an nice tutorial on how to make them here.

But since I had no sheet music on hand and I did have a sheet music fabric from a previous project for my mother in law (did I mention she's a music minister), I decided to improvise.

I used another flower making technique from Ms. Jones found here to make the larger flowers on the outsides. She calls them gathered flowers and even has a free downlaodable (is that a word?) template that I used to create the flowers. This is also super easy to do, although I found it a little too time-consuming for me (I think I was about 3 Law & Order episodes in by now).


So, for the rest of the flowers, I used my own technique, which I will do my best to explain.
(Up to the date...I now have a full blown tutorial for these flowers here: Super Easy Fabric Flower)

1. First I cut strips of my fabric about 2-3 inches wide. And to achieve the frayed look, I ripped the fabric instead of using scissors.

2. Then I folded the fabric in half length wise, so I ended up with long strips that were about 1-1.5 inches wide.

3. Next I cut slits about 1 cm in width across the entire strip. The slits were cut from the the unfolded edge of the strip down to the folded edge without cutting through the fabric. I did my best to show that in this picture:


4. Next, I rolled the strips using hot glue on the folded edge to secure, leaving the the slits open at the top.

5. Fianlly I hot glued them to my yarn wrapped wreath and used another strip of fabric to hang the wreath up.

I think it turned out pretty cool.

IMG_7106

5/17/11

Knocked Up!

For all you friends asking for some belly pics here you go. This is me at 34 weeks.


For all you wondering what this has to do with the blog...well obviously Jeff did this to me.

Nursery Update (sans pictures)

Jeff and I have done a lot of work for the nursery lately and it is almost complete! I just need to take some pictures of all the projects, but here are some of the projects on the list that we can now cross off...yay!


  • Painted stripes on the walls


  • DIY'd a mirror to hide the yucky built-ins...tutorial coming!


  • hung and painted spice rack turned bookshelves using this idea


  • DIY'd a statement art piece/modern wall clock using this tutorial.

  • DIY'd a pendant lamp using this tutorial


  • Installed new track lighting fixture


  • made a funky baby mobile


  • sewed my own crib sheet


  • Hung some chalkboard art


  • painted thrift store dresser


  • recovered hand-me-down glider..yup, all by myself, and I am a beginner sewer, tutorial coming on this one too.


Still on the list


  • Sew crib skirt


  • Sew curtain for closet


  • Sew pillows


  • Hang DIY'd art


  • Clean and Organize!


Wow, we are almost done! This little guy is going to be here before we know it and I think his room might actually be ready for him. We are so excited how it has turned out so far and can't wait to share pictures and details with you soon!

5/16/11

Tic-Toc

11-diyasteriskclock
The other day I came across this awesome clock project and asked Jeff if he could make me one for the baby's room. Always eager for a new project (and I'm pretty sure he thinks its as cool as I do), he happily err lovingly obliged.

IMG_6981

The clock that Curbly made was a bit small for my liking (bigger is better with such an awesome piece), so I asked jeff if he could make it bigger (as he was half way through cutting the smaller version...oops!). The small version is totally fine, but I figured that if it would take the same amount of time (well if he hadn't already started), it would be way better to make this piece a feature in the room instead of something that might get lost with all the other accesories.

So he sarted over, using a projector this time to project the image from the template that Curbly provides, onto a piece of board (we dont know what its called) that he had on hand (from making floating book shelves in the nursery). He then ued his jigsaw to cut it out, sanded the edges, and installed a clock set he scored for free from his dad (no shame, this one). Then he used some cardboard-esq type of material for the hands and just hot glued it to the hands from the clock set. Then he painted it green to match the nursery. I love it! Thanks Curbly for the awesome idea and great tutorial!


IMG_6984

5/12/11

Seeing Stripes

When I first searched the web for nursery inspiration, I was especially inspired by these posts from Nursery Notations...an awesome website for nursery ideas. These pictures is particular stood out to me:


So Jeff and I turned my inspiration into this:

IMG_6571

IMG_6572

IMG_6573

IMG_6580

IMG_6582

IMG_6581

IMG_6593

IMG_6595

IMG_6592

That last picture is to show you how not perfect the stripes are! Here's how it went down...

Jeff got me started by taping out one wall of stripes. He has kind of an artist brain, so he just eye balled it. When I came in, I added a few more stripes to his stripes to create "my vision." Then I went all the way are the room with a laser level and tape. Notice in picture #2 how taping stripes is sooo fun.

Then Jeff came back in and painted the stripes, being careful not to paint the strip that I wanted to leave gray (notice the little slashes on that line). And then we both striped off the tape before the paint had completely dried.

What we could have done, to make the lines a bit more pristine (again see the last picture), is painted the stripes with the gray wall color first, allow to dry, and then paint white. That way, the gray paint seeps behind the tape creating a barrier for the white paint. But we are too impatient/lazy and the project was already tedious. So eventually, Jeff went in with gray paint and touched up the especially bad areas (like the last picture).

We think it turned out great! Do you like?